VSCode安装及配置(前端开发必备) |
您所在的位置:网站首页 › visual studio需要配置环境变量吗 › VSCode安装及配置(前端开发必备) |
VSCode安装及配置(前端开发必备)
|
VSCode安装及配置
1. 下载并安装VSCode
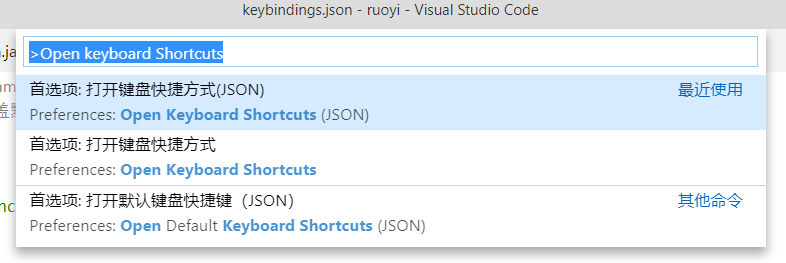
从官网下载安装包,https://code.visualstudio.com/ 本文以Windows环境为例,安装位置D:/Software/,其他全部选中默认即可。 2. 安装插件安装完成打开VS Code,点击左边工具栏的Extensions (Ctrl+Shift+X),在搜索框中输入插件名称,点击对应的Install进行插件安装。 2.1. 常用插件(可选) Chinese Language Pack for Visual Studio Code 中文(简体)Code Runner 万能代码运行工具Eclipse Keymap Eclipse 快捷键GitLens 方便查看git日志,git重度使用者必备Material Icon Theme vscode图标主题,支持更换不同色系的图标vscode-icons VSCode图标主题Markdown All in One markdown编辑,预览Project Manager 项目管理REST Client HTTP请求工具 2.2. 前端基础插件(推荐) Auto Complete Tag 自动补全标签 包含 Auto Close Tag、Auto Rename TagAuto Import 自动导入包Bracket Pair Colorizer 让括号拥有独立的颜色,易于区分。可以配合任意主题使用px to rem & rpx (cssrem) px转换为remDebugger for Chrome 映射vscode上的断点到chrome上,方便调试EditorConfig for VS Code .editorconfig插件ESLint js语法纠错HTMLHint html代码检测Prettier - Code formatter Prettier格式HTML CSS Support 智能提示CSS类名以及idHTML Snippets 智能提示HTML标签,以及标签含义JavaScript(ES6) code snippets ES6语法智能提示,以及快速输入,不仅仅支持.js,还支持.ts,.jsx,.tsx,.html,.vue,省去了配置其支持各种包含js代码文件的时间Path Autocomplete 路径智能补全,比Path Intellisense强,可以连续提示,不用按“/”Import Cost 显示您在VS代码编辑器中导入的程序包的大小CSS Peek 将鼠标悬停在元素的类名或ID上,就可以看到应用于这个元素的CSS规则Better Comments 代码注释高亮 2.3. React插件(可选) ES7 React/Redux/GraphQL/React-Native snippetsReact-Native/React/Redux snippets for es6/es7React/Redux/react-router SnippetsSimple React Snippets 2.4. VUE插件(可选) Vetur Vue多功能集成插件,包括:语法高亮、智能提示、emmet、错误提示、格式化、自动补全、debuggerVue VSCode SnippetsVueHelper Vue代码提示 2.5. Angular插件(可选) Angular 7 Snippets Angular语法填充(标签)Angular Files 生成Angular的文件模板(Component、Module、Pipe等等)Angular Follow Selector 文件跳转(Component跳转到html、scss文件)Angular Language Service 引用填充和跳转到定义(html中进行引用补全) 2.6. 其他前端插件(了解) Beautify 格式化代码jQuery Code Snippets jQuery代码智能提示open in browser 在浏览器中打开htmlfileheader 顶部注释模板,可定义作者、时间等信息,并会自动更新最后修改时间filesize 在底部状态栏显示当前文件大小,点击后还可以看到详细创建、修改时间SassSass FormatterQuokka.js 在代码编辑器中显示各种执行结果Babel JavaScript 支持ES201x,React和JSX语法高亮npm Intellisense 对package.json内中的依赖包的名称提示TabNine 是一款基于人工智能的代码自动补全工具Live Server 实时简易服务器,支持html/css/javascript 2.7. Java开发插件(了解)Java Extension Pack 这一个Java扩展包中,就已经包含最常用的6个扩展 Language Support for Java™ by Red Hat Debugger for Java Java Test Runner Maven for Java Java Dependency Viewer Visual Studio IntelliCodeLombok Annotations Support for VS Code Java Code Generators Spring Boot Tools Spring Boot Extension Pack 3. 自定义配置 3.1. 设置eclipse快捷键作为一个重度eclipse患者,vs code纵有千万好有些快捷键还是很想延用eclipse的快捷键。 【管理】–> 【命令面板… Ctrl + 3】 --> 输入 Open keyboard Shortcuts --> 打开keybindings.json文件
文件 --> 首选项 --> 设置 --> 用户 Font Size 设置为14 Font Family 设置为 ‘Courier New’, monospace 放大:查看 > 外观 > 放大 对应快捷键 Command + = 缩小:查看 > 外观 > 缩小 对应快捷键 Command + - 3.3. 工作空间设置文件 --> 首选项 --> 设置 --> 工作区 --> settings.json { "folders": [ { "path": "." } ], "settings": { // 默认格式化工具 "editor.defaultFormatter": "esbenp.prettier-vscode", // Vue中体验Emmet "emmet.syntaxProfiles": { "vue-html": "html", "vue": "html" }, "eslint.validate": ["javascript", "javascriptreact", "typescript", "typescriptreact", "vue", "html", "jsx"], "files.exclude": { "node_modules/": true }, "liveServer.settings.multiRootWorkspaceName": "", "liveServer.settings.port": 5500, //设置本地服务的端口号 "liveServer.settings.root": "/dist", //设置根目录,也就是打开的文件会在该目录下找 "liveServer.settings.CustomBrowser": "chrome", //设置默认打开的浏览器 "liveServer.settings.AdvanceCustomBrowserCmdLine": "chrome --incognito --remote-debugging-port=9222", "liveServer.settings.NoBrowser": false, "liveServer.settings.ignoredFiles": [".vscode/**", "**/*.scss", "**/*.sass"], "search.exclude": { "**/node_modules": true, "**/bower_components": true }, // #vetur 配置 "vetur.format.defaultFormatter.html": "prettyhtml", "vetur.format.defaultFormatter.css": "prettier", "vetur.format.defaultFormatter.postcss": "prettier", "vetur.format.defaultFormatter.scss": "prettier", "vetur.format.defaultFormatter.less": "prettier", "vetur.format.defaultFormatter.stylus": "stylus-supremacy", "vetur.format.defaultFormatter.js": "prettier", "vetur.format.defaultFormatter.ts": "prettier", "vetur.format.defaultFormatterOptions": { "js-beautify-html": { // 属性强制折行对齐 "wrap_attributes": "force-aligned" }, "prettyhtml": { "singleQuote": false, "sortAttributes": true } } } } 3.4. 用户设置(可选)文件 --> 首选项 --> 设置 --> 用户 --> settings.json { "workbench.colorTheme": "KotStream Theme", "workbench.iconTheme": "vscode-icons", "editor.fontFamily": " 'Courier New', monospace", "workbench.startupEditor": "welcomePage", "window.zoomLevel": 1, } 4. 项目配置文件 4.1. .editorconfig文件配置 # http://editorconfig.org root = true [*] charset = utf-8 indent_style = space tab_width = 2 end_of_line = lf insert_final_newline = true trim_trailing_whitespace = true [*.md] trim_trailing_whitespace = false [*.{yml,ini}] indent_style = space indent_size = 2 4.2. .eslintrc.js文件配置在项目根目录下创建.eslintrc.js文件,根据项目配置规则。例如: 如果违反了规则情况下,这里的数字:0表示不不处理,1表示警告,2表示错误并退出 // ESlint 检查配置 module.exports = { extends: [require.resolve('@umijs/fabric/dist/eslint')], globals: { ANT_DESIGN_PRO_ONLY_DO_NOT_USE_IN_YOUR_PRODUCTION: true, page: true, REACT_APP_ENV: true, }, root: true, /** * 自定义扩展规则 * "off" 或 0 - 关闭规则 * "warn" 或 1 - 开启规则,使用警告级别的错误:warn (不会导致程序退出), * "error" 或 2 - 开启规则,使用错误级别的错误:error (当被触发的时候,程序会退出) */ rules: { // 'import/no-extraneous-dependencies': 0, // 'import/no-unresolved': 0, // 'import/no-dynamic-require': 0, // 'global-require': 0, // // 'no-unused-vars': 'off', // '@typescript-eslint/no-unused-vars': 0, // // // 可能的错误 // // // // 禁止条件表达式中出现赋值操作符 'no-cond-assign': 2, // 禁用 console 'no-console': [1, { allow: ['warn', 'error'] }], // 禁止在条件中使用常量表达式 'no-constant-condition': 2, // 禁止在正则表达式中使用控制字符 :new RegExp("\x1f") 'no-control-regex': 2, // 数组和对象键值对最后一个逗号, never参数:不能带末尾的逗号, always参数:必须带末尾的逗号, // always-multiline:多行模式必须带逗号,单行模式不能带逗号 'comma-dangle': [1, 'always-multiline'], // 禁用 debugger 'no-debugger': 1, // 禁止 function 定义中出现重名参数 'no-dupe-args': 2, // 禁止对象字面量中出现重复的 key 'no-dupe-keys': 2, // 禁止重复的 case 标签 'no-duplicate-case': 2, // 禁止对 catch 子句的参数重新赋值 'no-ex-assign': 2, // 禁止不必要的分号 'no-extra-semi': 2, // 禁止在字符串和注释之外不规则的空白 'no-irregular-whitespace': 2, // 禁止在return、throw、continue 和 break语句之后出现不可达代码 'no-unreachable': 2, // // 最佳实践 // // // 使用 === 替代 == allow-null允许null和undefined== eqeqeq: [2, 'allow-null'], // // 变量声明 // // // 禁止将变量初始化为 undefined 'no-undef-init': 2, // 禁止出现未使用过的变量 'no-unused-vars': [1, { vars: 'all', args: 'none' }], // 不允许在变量定义之前使用它们 'no-use-before-define': 0, // // 风格指南 // // // 'no-tabs': 0, // 缩进:规则,空额数量 indent: [2, 2, { SwitchCase: 1 }], // 不允许空格和 tab 混合缩进 'no-mixed-spaces-and-tabs': 2, // 禁用行尾空格 'no-trailing-spaces': 2, // 强制在花括号中使用一致的空格 'object-curly-spacing': 1, // 要求或禁止使用分号而不是 ASI(这个才是控制行尾部分号的,) semi: [2, 'always'], // 强制在 function的左括号之前使用一致的空格 // 'space-before-function-paren': [ // 1, // { anonymous: 'always', named: 'always', asyncArrow: 'always' }, // ], // 要求或禁止模板字符串中的嵌入表达式周围空格的使用 'template-curly-spacing': 1, }, }; 4.3. .prettierrc文件配置在项目根目录下创建.prettierrc文件,根据项目配置规则。例如: const fabric = require('@umijs/fabric'); module.exports = { ...fabric.prettier, arrowParens: 'avoid', bracketSpacing: true, jsxBracketSameLine: false, printWidth: 120, semi: true, singleQuote: true, tabWidth: 2, trailingCooma: 'all', useTabs: false, useWorkspaceDependencies: false, }; 4.4. tsconfig.json文件配置在项目根目录下创建jsconfig.json文件,根据项目配置规则。例如: { "compilerOptions": { "outDir": "build/dist", "module": "esnext", "target": "esnext", "lib": ["esnext", "dom"], "sourceMap": true, "baseUrl": ".", "jsx": "preserve", "allowSyntheticDefaultImports": true, "moduleResolution": "node", "forceConsistentCasingInFileNames": true, "noImplicitReturns": true, "suppressImplicitAnyIndexErrors": true, "noUnusedLocals": true, "allowJs": true, "skipLibCheck": true, "experimentalDecorators": true, "strict": true, "paths": { "@/*": ["./src/*"], "@@/*": ["./src/.umi/*"] } }, "include": [ "mock/**/*", "src/**/*", "tests/**/*", "test/**/*", "__test__/**/*", "typings/**/*", "config/**/*", ".eslintrc.js", ".stylelintrc.js", ".prettierrc.js", "jest.config.js", "mock/*" ], "exclude": ["node_modules", "build", "dist", "scripts", "src/.umi/*", "webpack", "jest"] } 5. VSCode Debugger 5.1. 调试本地js文件1)新建一个 js文件,如 index.js,输入以下内容: var a = 1; var b = 2; console.log("hello world"); console.log("a = ", a); console.log("b = ", b);2)运行程序 进入运行和调试视图,点击添加配置,创建lanuch.json文件, 输入以下内容: { // 使用 IntelliSense 了解相关属性。 // 悬停以查看现有属性的描述。 // 欲了解更多信息,请访问: https://go.microsoft.com/fwlink/?linkid=830387 "version": "0.2.0", "configurations": [ { "name": "Launch", "type": "node", "request": "launch", "program": "${workspaceRoot}/src/index.js", } ] }注意这里的src/index.js的文件名称要改成你自己定义的文件名称,其中的workspaceRoot 表示当前文件路径。 再按下 F5 的时候,记得配置文件一定要选择名为 Launch (和上面的name同名) 的那个配置文件运行,配置了 launch.json 文件,你还可以在 js 文件中打上断点进行调试。如下图所示 5.2. 调试HTML项目1)环境配置: 安装Live Server插件 File -> Preferences -> Settings, 输入 breakpoints,找到 Debug: Allow Breakpoints Everywhere,勾上允许在任何文件设置断点(这样才可以在html文件中设置断点) 2)新建一个 html 后缀的文件,如 index.html ,输入以下内容: DOCTYPE html> function myFunction() { console.log("hello world"); document.getElementById("demo").innerHTML="My First JavaScript Function"; alert("this is a place where can write code."); } My Web Page A Paragraph Try it右键index.html,选择Open with Live Server打开文件,默认启动**5500**端口 3) 运行程序 进入运行和调试视图,点击添加配置,创建lanuch.json文件, 输入以下内容: { // 使用 IntelliSense 了解相关属性。 // 悬停以查看现有属性的描述。 // 欲了解更多信息,请访问: https://go.microsoft.com/fwlink/?linkid=830387 "version": "0.2.0", "configurations": [ { "type": "pwa-chrome", "request": "launch", "name": "Launch Chrome against localhost", "url": "http://localhost:5500", "webRoot": "${workspaceFolder}" } ] }然后在 script 的代码部分打上断点,按下 F5 ,点击 Try it 按钮,你可以看到中间结果了。 |
【本文地址】
今日新闻 |
推荐新闻 |